As an iOS developer, you may have encountered the need to integrate your Xcode projects with GitHub, a popular platform for version control and collaboration. By integrating Xcode with GitHub, you can easily push your code changes, pull the latest updates, and collaborate seamlessly with other developers.
In this blog post, I will guide you through the process of integrating Xcode with GitHub using an access token. This method allows you to securely authenticate your Xcode projects with GitHub, ensuring that your code remains protected and accessible only to authorized users.
You can also share your code with Swift Package Manager and publish it on GitHub. If you’re new to Swift Package Manager or want to learn more about its capabilities, make sure to check out my previous blog post on How to Create Your First Package with Swift Package Manager. This tutorial will introduce you to the fundamentals of creating and integrating Swift packages locally in Xcode, empowering you to share your code efficiently on GitHub.
By the end of this tutorial, you will have a clear understanding of the steps involved in setting up and using GitHub access tokens in Xcode. So let’s dive in and get started with integrating Xcode and GitHub!
Prerequisites
Before we dive into integrating Xcode with GitHub access token, make sure you have the following prerequisites in place:
- Xcode: Ensure that you have Xcode installed on your Mac. Xcode is the primary development environment for iOS apps and provides all the necessary tools and resources.
- GitHub Account: You’ll need a GitHub account to generate an access token. If you don’t have one, head over to GitHub and create an account.
How to Create a New GitHub Access Token
To integrate Xcode with GitHub, you’ll need to generate a GitHub access token. Follow these steps to generate your access token:
- Create a new account for free and go to https://github.com/settings/tokens/new
- Provide a meaningful note to describe the token’s purpose, such as “Xcode integration
- Choose the Expiration of your token. Because I don’t want to do this every month. I set it to expire in a year mid 2024.
- Under “Select scopes”, choose the appropriate permissions for the token. For Xcode integration, select at least the “repo” scope to allow access to repositories.

Once you’ve selected the desired scopes, click on the “Generate token” button at the bottom of the page.

GitHub will generate a new access token for you. Make sure to copy and save this token in a secure location, as you won’t be able to see it again after leaving the page.
Congratulations! You have successfully generated a GitHub access token. Now, let’s move on to configuring Xcode with this token.

Configuring Xcode with the GitHub Access Token
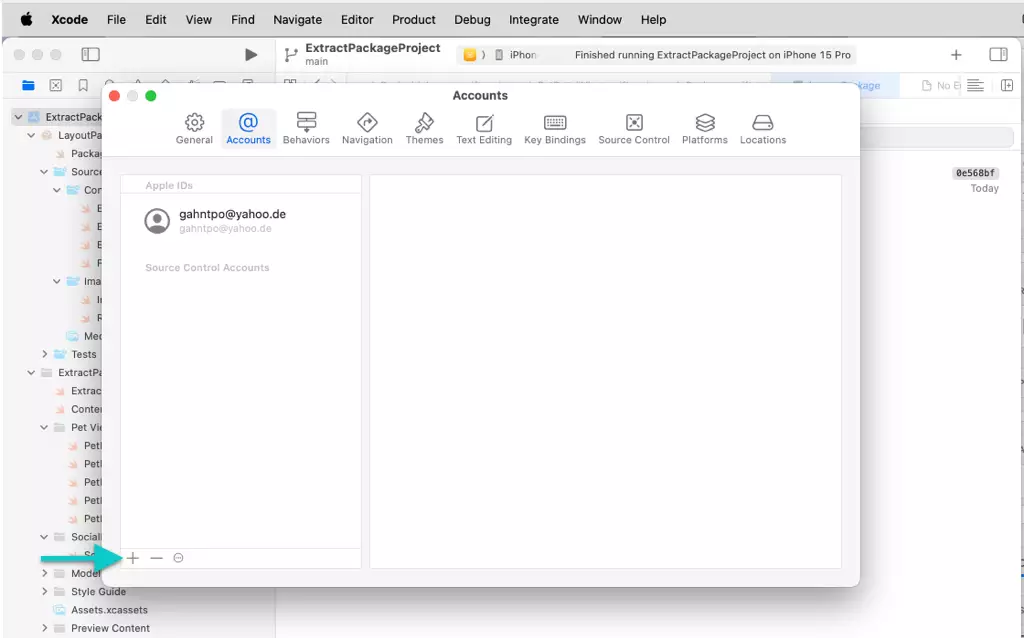
Open Xcode and navigate to the Preferences window. You can access this by clicking on Xcode in the menu bar and selecting Settings.

In the Preferences window, locate and click on the Accounts tab. Here, you will see a list of accounts already added to Xcode.
To add your GitHub account, click on the ”+” button at the bottom left corner of the Accounts tab. A dialog box will appear with a list of available account types.
Note if you signed in to GitHub before and you need to add a new token, make sure to first remove the current GitHub connection by pressing the “-” button. Otherwise, I got an error and I did not find an option to change only the token.

Select GitHub from the list and click on the Continue button.

Xcode will prompt you to sign in to your GitHub account. Enter your account email and the newly generated access token. Press “Sign In”.

Once authorized, you will be redirected back to Xcode’s Accounts tab. Here, you should see your GitHub account listed.
Congratulations! You have successfully configured Xcode with your GitHub access token. Now you can take advantage of Xcode’s built-in version control features to commit and push changes directly to your GitHub repository.

What you can do with your GitHub Integration
Once you have successfully configured Xcode with your GitHub access token, you can take advantage of various features and functionalities:
- Version Control: Xcode seamlessly integrates with GitHub, allowing you to commit, push, and pull changes directly from within the Xcode interface. This simplifies collaboration and ensures that your code is always up to date.
- Branch Management: With Xcode and GitHub integration, you can easily create and switch between branches, merge changes, and resolve conflicts, all within the Xcode environment. This makes it effortless to manage different versions of your codebase.
- Issue Tracking: Xcode enables you to link your GitHub issues directly to your Xcode project, making it easier to track and manage bug fixes, feature requests, and other tasks. You can reference and update issues without leaving Xcode, streamlining your development workflow.
- Code Reviews: Xcode’s integration with GitHub allows for efficient code reviews. You can easily create pull requests, review code changes, provide feedback, and merge approved changes back into the main codebase, all within Xcode.
Furthermore, the integration allows you to leverage the Swift Package Manager (SPM) to create and share your code with the Swift community. With SPM, you can package your code into reusable modules, making it easier to share and maintain across projects.
If you’re interested in learning more about creating Swift packages and sharing them on GitHub, check out my blog post on How to Create Your First Package with Swift Package Manager, specifically the section on “Sharing a Package on GitHub.”
Conclusion
By integrating Xcode with your GitHub access token, you can enhance your iOS development workflow, improve collaboration with your team, and ensure efficient version control. Take advantage of these powerful features to streamline your development process and deliver high-quality iOS applications.
Further Reading
