

If you’ve spent any time reading about SwiftUI architecture, you’ve probably run into the term “view model.” And you’ve probably noticed that it means different things to different people. Some tutorials add a view model to every single view without ever explaining why. Others say SwiftUI doesn’t need view models at all, because “the view is already the view model.”
So what is a view model, really? In this post, I want to give you a clear, practical definition that you can apply to your own code. Here’s the main rule that I find most practical, so you have something to hold on to:
A view model owns UI state and is responsible for mutating that state properly and consistently.
Notice what’s not in that sentence: a single view. A view model isn’t tied to one view. It can support one view, an entire screen, or several views that share the same state. (Other people might say otherwise, but I am giving you the system that works best for me)
That responsibility is the whole point. In SwiftUI, state drives the UI. When something on screen is wrong, the cause is almost always state that’s wrong. And state goes wrong because the code that mutates it is messy: scattered across views, duplicated in slightly different versions, or running steps in the wrong order. A view model gives those mutations one home, so they happen the same way every time.
That’s it. Everything else in this post explains what that means, why it’s useful, and where the boundaries are.
Where MVVM Comes From
MVVM stands for Model-View-ViewModel. It was introduced in 2005 by Microsoft architects Ken Cooper and Ted Peters. I don’t usually spend much time on history, but here it matters because understanding where the pattern came from helps us understand what it’s actually trying to do.
MVVM was born in Windows Presentation Foundation, or WPF. The UI in WPF is written in XAML, a declarative markup language, and it relies heavily on data bindings and reactive updates. In other words, it’s state-driven, declarative programming. Sound familiar? That’s very close to how SwiftUI works.
So what problem was MVVM designed to solve? It came down to people. In WPF, teams naturally split into two groups: UI-facing developers, who Microsoft called “designer developers,” and logic developers working behind the scenes. The challenge was letting these two groups work in parallel without stepping on each other’s toes.
What kept happening was that logic crept into the view: network requests, formatting, data transformations. The view code became cluttered and hard to maintain, and when everyone has to work in the same file, collaboration breaks down fast.
The solution was to pull that complex logic out of the view and into a separate layer. The view was left with nothing but declarative UI, and the logic developers had their own layer to work in. That separate layer is the view model.
The Backing Layer: A Presentation Layer Pattern
The best way to think about a view model is as the backing layer behind your UI. You have the view on one side and your data on the other, and you place an intermediate layer in between. That layer handles the more complex concerns: state management, formatting, anything you don’t want cluttering your view code.
I like to compare it to an old-school calculator. On the front, you see the buttons and the display. That’s your view. Now imagine you unscrew the case and look inside: the battery, the circuit board, some cables. That’s your backing layer. As a user, you just want to press buttons and get results. You don’t want to see or deal with the internals. A view model works the same way: it keeps the inner workings hidden behind a clean surface.

That’s why I often prefer the term UI backing layer over “view model.” It describes what the thing actually does.
This also leads to an important clarification. Because we’re talking about layers, you’ll sometimes hear MVVM described as a “UI architecture pattern.” That can be misleading, because it gives the impression that MVVM is a full app architecture. It’s not. MVVM is a presentation layer pattern. It’s about the view and the code that directly backs it.
- It’s not about visual design, like layout, colors, or components.
- It doesn’t tell you how to structure your whole app. Networking, persistence, navigation, and dependencies need their own layers and patterns.
- At its core, it’s about separation of concerns within the UI layer.
The Three Layers
Let’s look at each part of the pattern and what it’s responsible for.
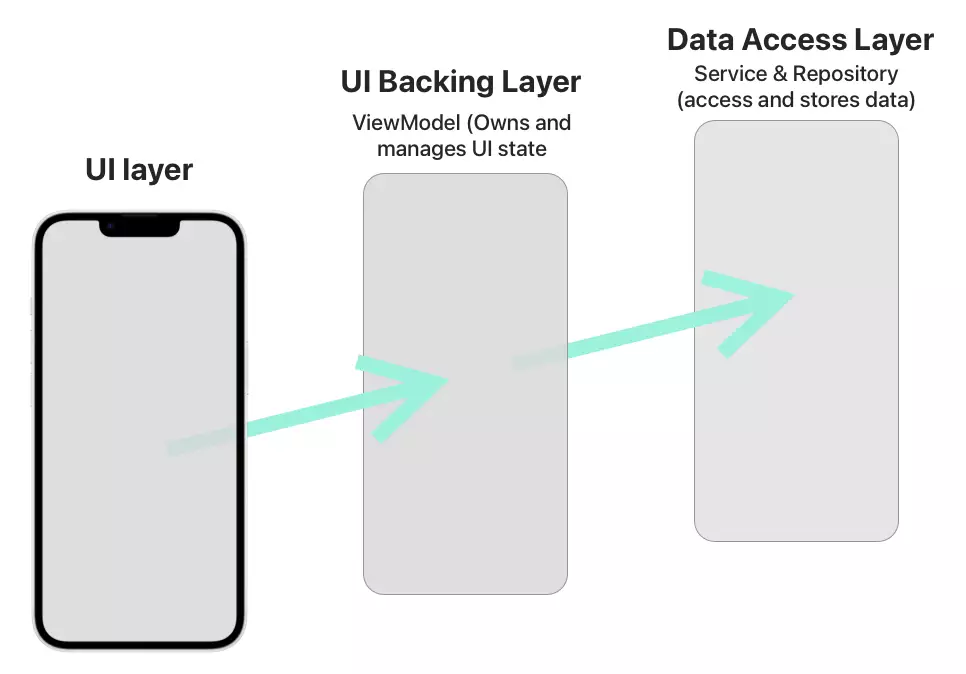
The View
The view is the UI layer. In SwiftUI, these are your View structs, and their job is to take state and decide what to display. Logged in? Show the main content. Logged out? Show the login screen.
Views also handle the finer details of presentation. Is a button enabled or disabled? What text goes into a label? What font, what position, what layout? These are all view concerns. The view is the part that makes things look good.
Views also receive user interactions. When someone taps a button, the view picks that up. Sometimes it handles the interaction directly, but more often it passes the user’s intent along to the view model. The view just says “the user tapped this” and moves on.
The View Model
The view model is the UI backing layer. Because SwiftUI is state-driven, everything revolves around UI state, and managing that state can get complex. When do you change it? What moves you from loading to success, or to an error? What happens when a network request comes back? All of this needs to live somewhere, and that somewhere is the view model.
The view model owns the UI state and decides when and how it changes. It can also prepare data for display, like formatting a price, and act as a gatekeeper for what’s allowed to happen.
The Model
The model is your data: the structures your app works with, and the logic that naturally belongs to that data, like validation rules.
You’ll find that different developers mean different things by “model.” Some put their networking code here too. That’s a valid interpretation, but to keep things clear, I keep the model narrow: the data itself, plus the logic intrinsic to it.
What Defines a View Model: UI State + Mutations
You can characterize any view model by two things: what state it holds, and how it can change that state. That’s really all that defines it.
- UI state: the data your views need to render. The items in a list, whether something is loading, an error message, which item is selected, whether a button is allowed to be tapped.
- Methods to change UI state: controlled mutations of that data. Adding an item, logging in, deleting a theme.
Because the view model backs the UI, its state has to be connected to the views that display it. That comes with two technical requirements:
@Observable: SwiftUI needs to track the state so it can update the views whenever it changes. Without observation, the view has no way of knowing that something happened.@MainActor: the UI reads this state, and UI work happens on the main actor. So the state, and the code that changes it, lives there too.
@MainActor
@Observable
final class CartViewModel {
    private(set) var items: [CartItem] = []   // UI state

    func addItem(id: String) { /* ... */ }    // mutation
    func removeItem(id: String) { /* ... */ } // mutation
}There’s one more rule I find really helpful: a view model communicates through state, never through UI instructions. Say a user isn’t allowed to buy a certain product. The view model doesn’t say “disable the button.” It says “this action is not allowed.” The view is the one that translates that into a disabled button.
In the same way, a view model can prepare data for display, like turning a raw price into a formatted string. But it never decides how that information is rendered. It knows what to show, never how to show it. That’s view territory.
Why Put State and Mutations Together?
I like to use the law of proximity here: things that change together should live together.
You can look at UI state from two directions. When the state changes, the UI changes, so the state should live close to the views that use it. That’s true. But the state and the code that changes it belong together just as tightly.
Think about a SwiftUI view hierarchy where several views use the same state, and each of those subviews can mutate it. The state declaration moves higher up the view tree, but the code that changes it is scattered across different subviews. Things get messy quickly. If you want to know where a value was changed, you have to go hunting through the hierarchy.
A view model brings them back together. The state lives in one place, and the methods that change it live right next to it. You get a single source of truth for the state, and one place that’s responsible for changing it properly and consistently.
That gives you a few concrete benefits:
- Consistent mutations: every change goes through the same methods, so it happens the same way every time.
- No duplicated logic: if several views need to make the same change, they call the same method. Duplicated logic tends to drift. Sooner or later you update one copy and forget the other, and your state goes out of sync.
- Easier to follow: when you want to know how the state changes, you look in one place.
Example: The Shopping Cart
Let’s see how these layers play out with a shopping cart.
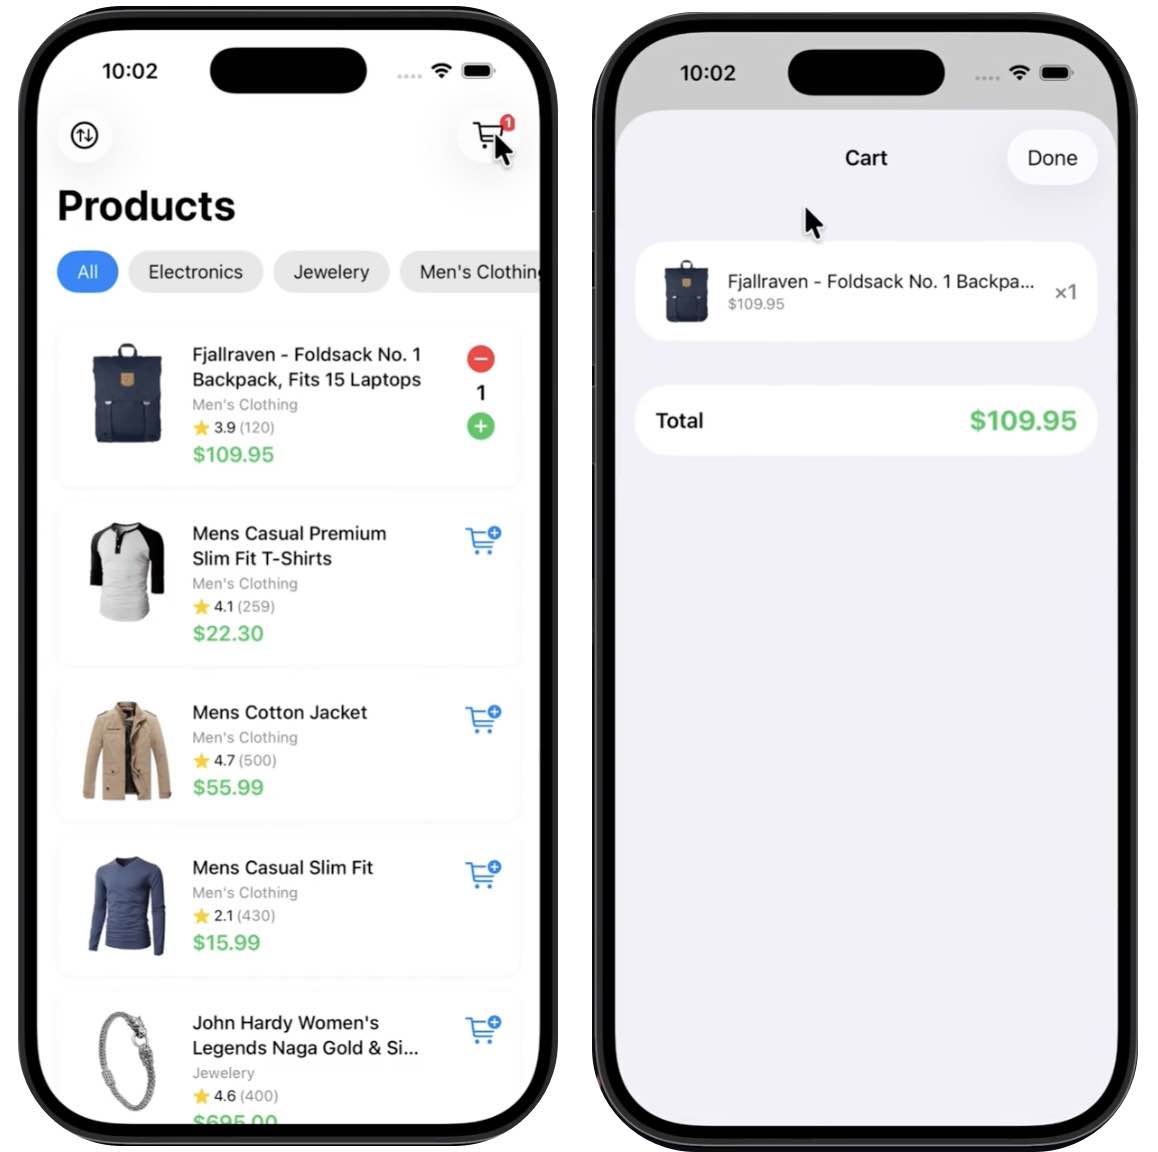
The Model
The model is the raw data: a cart item with a product ID and a quantity, and the product information itself.
struct CartItem {
    let id: String
    var quantity: Int
}

struct Product {
    let id: String
    let name: String
    let price: Double
}This isn’t what the UI wants to show, though. The view needs a name, a quantity, and nicely formatted prices, all in one place. So we add a display type that has exactly what the view needs:
struct CartDisplayItem {
    let id: String
    let name: String
    let quantity: Int
    let formattedPrice: String
    let formattedSubtotal: String
}The View Model
The view model owns the state of what’s in the cart. It turns the raw data into display items, calculates the total, and acts as a gatekeeper: if the view wants to change the cart, it has to call addItem or removeItem. It can’t reach in and change the items directly, which is what private(set) makes sure of.
@MainActor
@Observable
final class CartViewModel {
    private(set) var items: [CartItem] = []
    private let products: [String: Product]

    init(products: [String: Product]) {
        self.products = products
    }

    // Converts model data into what the view displays
    var displayItems: [CartDisplayItem] {
        items.compactMap { item in
            guard let product = products[item.id] else { return nil }
            let subtotal = product.price * Double(item.quantity)
            return CartDisplayItem(
                id: item.id,
                name: product.name,
                quantity: item.quantity,
                formattedPrice: formatPrice(product.price),
                formattedSubtotal: formatPrice(subtotal)
            )
        }
    }

    var formattedTotal: String {
        let total = items.reduce(0.0) { sum, item in
            guard let product = products[item.id] else { return sum }
            return sum + product.price * Double(item.quantity)
        }
        return formatPrice(total)
    }

    // Gatekeeper: the view tells us what it wants, we decide if it's allowed
    func canAddItem(id: String) -> Bool {
        true // e.g. check stock or purchase limits
    }

    func addItem(id: String) {
        if let index = items.firstIndex(where: { $0.id == id }) {
            items[index].quantity += 1
        } else {
            items.append(CartItem(id: id, quantity: 1))
        }
    }

    func removeItem(id: String) {
        items.removeAll { $0.id == id }
    }

    private func formatPrice(_ price: Double) -> String {
        price.formatted(.currency(code: "USD"))
    }
}The View
With all that logic in the view model, the view becomes very simple. No formatting, no calculations. Just a ForEach with some Text views, a font, and a disabled modifier.
struct CartView: View {
     var viewModel: CartViewModel

    var body: some View {
        VStack {
            ForEach(viewModel.displayItems, id: .id) { item in
                HStack {
                    Text(item.name)
                    Text("×(item.quantity)")
                    Spacer()
                    Text(item.formattedSubtotal)
                }
            }

            Text("Total: (viewModel.formattedTotal)")
                .font(.headline)

            Button("Add iPhone") {
                viewModel.addItem(id: "iphone")
            }
            .disabled(!viewModel.canAddItem(id: "iphone"))
        }
    }
}Notice how canAddItem works. The view model only answers “is this allowed?” The view decides that “not allowed” means a disabled button.
Now imagine all of this living inside the view: the price formatting, the subtotal and total calculations, the rules for adding and removing items. The view would get big and messy fast, and every other view that touches the cart would need its own copy of that logic.
“One View Model per Screen”: A Rule That Trips You Up
You’ll often hear that MVVM comes with a rule: one view model per screen, or even one per view. I understand why people like it. It’s simple, it’s easy to explain, and every screen gets its own neat little backing class.
But I think it’s a rule that breaks your app sooner or later, because it goes directly against the single source of truth.
Think about the shopping cart. The cart screen shows the items. But the product list also needs the cart: the user adds items from there, and maybe the tab bar shows a badge with the number of items. If every screen gets its own view model, you now have two view models holding their own copy of the cart. Add an item on the product list, and the cart screen doesn’t know about it. So you start syncing them: notifications, callbacks, reloading on appear. That’s exactly the messy state we wanted to avoid. You also end up writing the same addItem logic twice, and those two versions will drift apart.
There’s a second problem: lifetime. A view model created by a screen lives only as long as that screen. Navigate away and back, and the state is gone and has to be loaded again, even if it should have survived.
The issue is that the rule scopes view models by screens. But screens are a UI concern. What a view model actually manages is state, so that’s what should decide its scope.
A Practical Approach: Scope by State, Not by Screen
Here are the guidelines I use instead:
- Start from the state, not the screen. Ask: what state is this, and which views need it?
- Every piece of UI state has exactly one owner. One view model owns the cart. Not one per screen that shows the cart.
- Place the owner where the state needs to live. High enough in the view tree that every view that needs the state can reach it, and long-lived enough that the state survives as long as it should. If only one screen needs it, keep it there.
- Share the instance, don’t copy the state. Views that need the same state get the same view model passed in, and they all call the same methods to change it.
In the example above, CartView is short lived because its inside a sheet. It gets the ViewModel passed in from its parent. The product list needs it too. The ownership moves up: the app owns one CartViewModel and hands it to every view that needs it:
struct ContentView: View {
    @State private var cartViewModel = CartViewModel()
    @State private var cartIsShown = false

    var body: some View {
        ProductListView(cartViewModel, cartViewModel)
           .sheet(isShown: cartIsShown) {
               CartView(cartViewModel: cartViewModel)
            }
    }
}The product list adds an item, the badge updates, and the cart screen shows it, because they’re all looking at the same state, changed through the same methods.
Notice that “one view model per screen” can still happen with this approach. If some state really belongs to only one screen, its view model naturally ends up there. The difference is that it’s a result of where the state belongs, not a rule you apply up front.
Drawing the Line: UI State vs. Background Work
In the cart example, everything happened locally. In a real app, adding an item to a cart probably means asking a server whether the item is still available. So where does that network code go? Into the view model?
This is where one question helps you decide which layer code belongs to: does it own UI state?
- Yes → it’s a view model (or a store, whatever you want to call it). It’s
@Observable, it runs on@MainActor, and views are connected to it. - No → it belongs in a supporting layer behind the view model, like a service. It’s not observable, it’s not on the main actor, and it’s free to do its work in the background, for example with
@concurrentfunctions.
This isn’t just a naming preference. It’s the reason I draw the line exactly here. Anything the UI needs to observe has to be observable and has to live on the main actor, because that’s where SwiftUI reads it. Anything that doesn’t touch UI state shouldn’t be there. Networking, decoding JSON, reading and writing files: that’s heavy work, and we want it off the main actor so the UI stays responsive.
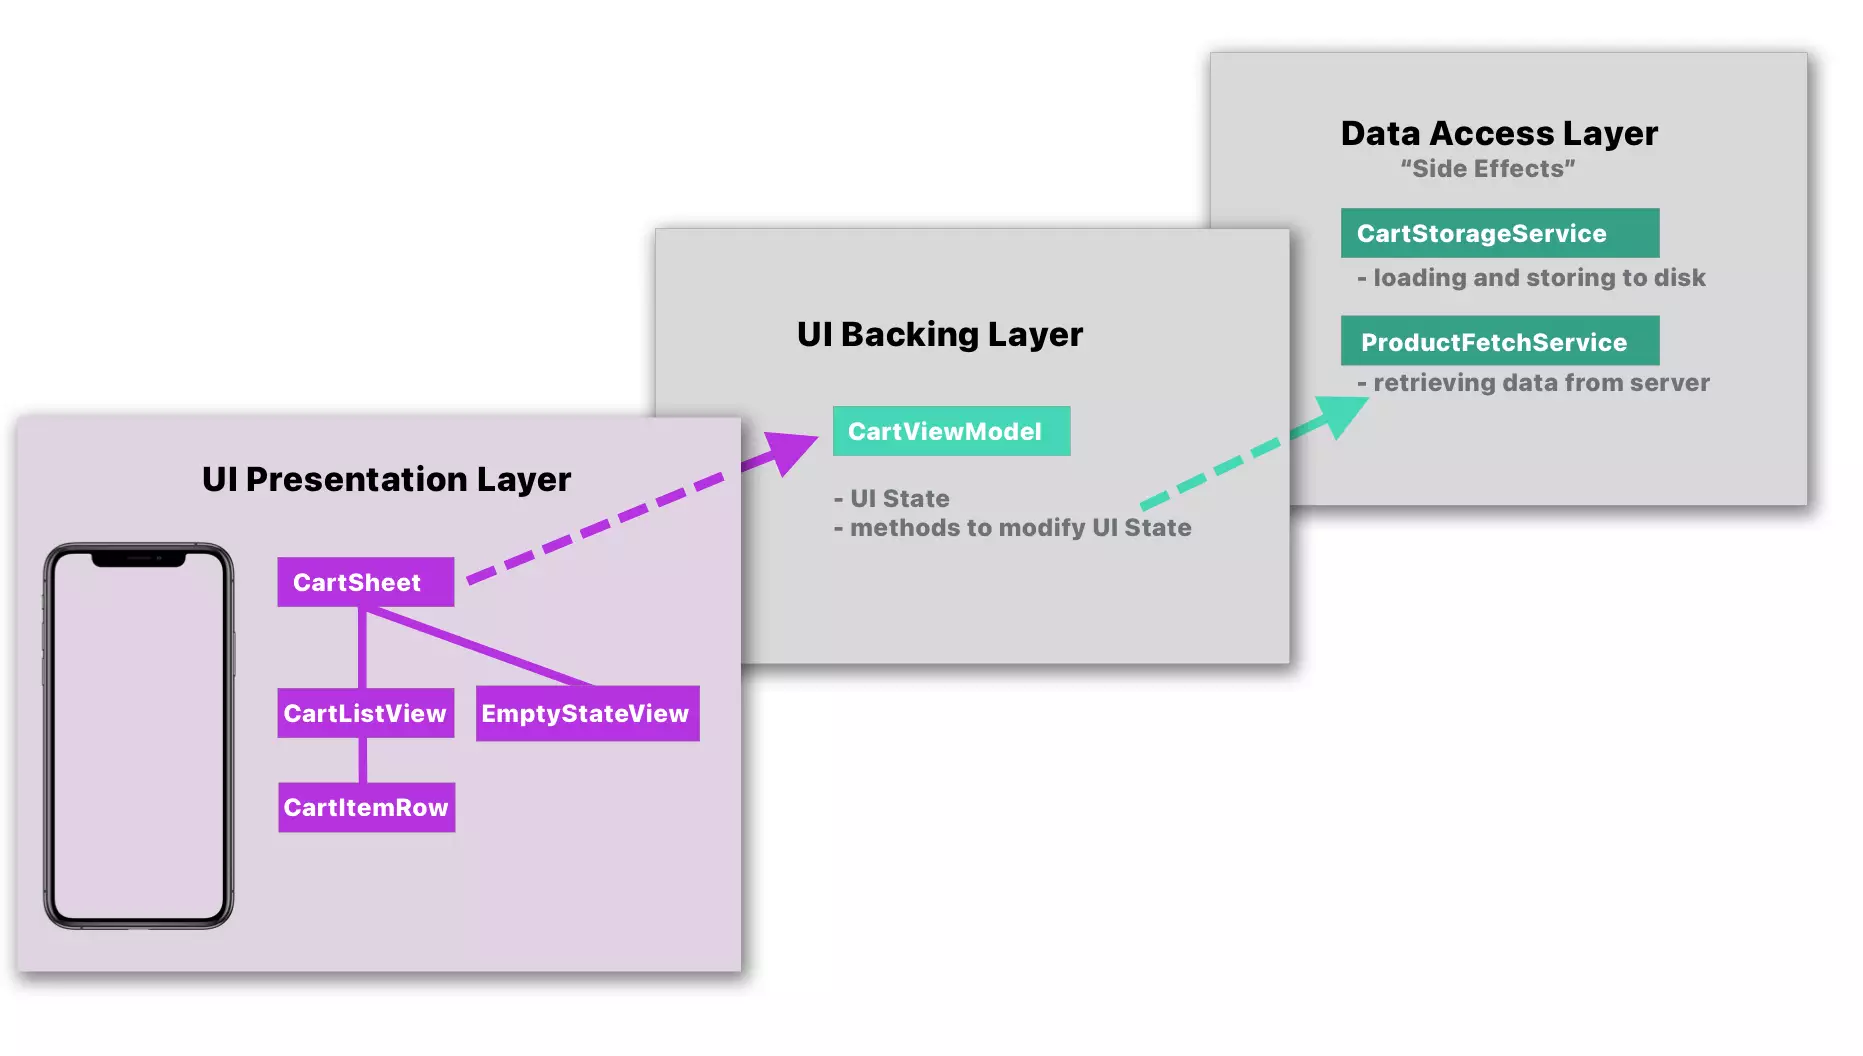
The user taps a button. The view passes that intent to the view model. The view model asks the service to do the work in the background. The data comes back, the view model updates its UI state on the main actor, and SwiftUI updates the view.
In code, the service is a small helper with no state of its own:
nonisolated struct CartService {
    @concurrent
    func addItem(id: String) async throws -> [CartItem] {
        // Send the request, decode the response,
        // and return the cart as the server sees it
    }
}And the view model uses it, but stays in charge of the state:
@MainActor
@Observable
final class CartViewModel {
    private(set) var items: [CartItem] = []
    private(set) var errorMessage: String?
    private let service = CartService()

    func addItem(id: String) async {
        do {
            items = try await service.addItem(id: id)
        } catch {
            errorMessage = "Couldn't add the item. Please try again."
        }
    }
}The service doesn’t know anything about the UI. The view model doesn’t know how the network request works. Each one has a clear job, and the boundary between them is exactly the boundary between the main actor and the background. This is good use of Separation of Concern principle (SoC).
This also explains why naming matters. If something owns UI state, call it a view model or a store, even if someone labeled it a “service.” I see this a lot in code on GitHub and in blog posts: a “service” that holds UI state in a project that supposedly has no view models. It’s basically one, and the wrong name hides which code runs where and what the UI connects to.
There’s more to say about this supporting layer, including the difference between services and repositories. I’ll cover that in a separate post.
A View Model Is Not “All Business Logic”
You’ll often read that the view model is where your “business logic” goes. The problem is that “business logic” is a bag of everything. It doesn’t actually help you decide where a piece of code belongs.
If you split it up, it becomes much clearer. Some business logic is about state: deciding what the UI should show and formatting data so it’s easy to display. That belongs in the view model. But a lot of business logic is about data access: network requests, file I/O, encoding and decoding. That belongs behind the view model, in the supporting layer.
So instead of “the view model holds the business logic,” I’d put it this way: the view model holds the UI state and the logic that changes it. Everything else gets offloaded. This can lead to the dreaded “God” View Model, another mess we want to avoid.
A Tool, Not a Rule
MVVM doesn’t mean you have to use a view model for every single view. In one of the original blog posts, Cooper and Peters made a point of saying they didn’t see it as a purist thing you apply everywhere. They saw it as a pattern that comes up naturally during development, something you reach for when the situation calls for it.
You always have the choice to keep all your code in the view. It’s your codebase. But when your views start piling up logic and state mutations, a view model is a very good tool to have.
This brings us back to the argument that “the view is already the view model.” If you compare SwiftUI with WPF, where MVVM started, there are a lot of similarities: declarative UI, data bindings, reactive updates. And the goals are the same: keep your code organized, keep your views simple, and have clear rules for separating code into layers.
So the argument is a bit strange when you think about it. Nobody ever said you need a view model. The real question is when one helps you, and in which situations.
Wrapping Up
Let’s bring it all together. A view model is a UI backing layer, and it’s defined by two things:
- A single source of truth for UI state: the data your views need to render.
- A single source of state mutations: the methods responsible for changing that state properly and consistently.
Because it backs the UI, it’s @Observable and runs on @MainActor. Anything that doesn’t own UI state, like networking or file access, belongs in a supporting layer behind it, where it can do its work in the background.
But a view model is also an extra layer, and every layer has a cost. In the next post, When to Use a View Model (and When It’s Overkill), we’ll look at concrete examples of when that cost is worth paying, and when a view-only solution is the better choice.